
Some time ago (2004), I stumbled upon The Dented Helmet, the definitive source for Star Wars prop collecting and customization.
I eventually began some dialogue with a member of the 501st Legion who referred me to an individual who was considered THE source for the Boba Fett Mystery Helmet - a helmet that is a direct cast from the original mold used in the Star Wars Classic Trilogy (and not sold through "normal" distribution channels).
After purchasing my Mystery Helmet, I realized that I should practice and perfect my painting techniques on less expensive helmets before attempting to customize the MH - which I wanted to be absolutely perfect. Don Post helmets were the ideal template to begin practicing on! The experience I gained from customizing numerous DP helmets over the years gave me the confidence to finish my Mystery Helmet last year - that of which I am very proud of. After completion of my project, I realized that I had a considerable amount of paint left over, and could possibly customize a few more helmets with what remained. So, earlier this year (2009), I decided to take on yet another DP helmet but doing so in similar fashion to the process used for my Mystery Helmet.

Below you will find my guide to the process I used to customize one of the many Don Post Boba Fett helmets I've worked on both for myself and others as well. Before each chapter, I noted the tools and supplies needed, and the approximate amount of time you'll need to invest.

Additional prop item(s) you will need:
Visor: (Updated for 2016) Hobart 770580 Face Shield Replacement Lens from Amazon.com
Note: Do NOT purchase the visor by Rembrandt Industries through eBay. The curvature of the lens is too extreme and hardly pliable to accommodate a Don Post Helmet without excessive force (e.g. a 20 pound weight and industrial strength Liquid Nails).
Supplies Needed:
3M Adhesive Spray: Used for affixing the foam padding to material, and to the interior of the helmet.
Bondo in the event you make a minor cutting mistake or unintentional indentation. Bondo comes in a few forms, but you would want the one in a tube.
Double-Epoxy or Liquid Nails: Adhesive recommended for affixing the tinted visor.
LocTite Liquid Metal. Use this only to repair any uneven cutting of the T-Visor. This is very similar to Bondo, but a lot stronger once its cured.
Loctite Super Glue (optional): Adhesive recommended for fine glue work. Easily identified by its orange/red buttons on the bottle's sides.
Masking tape: Standard masking tape as well as a painters tape with less adhesive (1" and 2.5" variety).
Paint Thinner: Do not confuse paint thinner with acetone. Some paints, such as Polly-Scale will gum-up if you try to dilute them with acetone. Use a bona-fide paint thinner such as Testor's brand if you intend to dilute your paint for airbrush use.
Paper Towels: You will need lots of them.
Primer: My new favorite primer is Duracoat which is "building primer" that fills small imperfections. It can be found in the automotive section of a store like Wal-Mart. You can also use a brand like Krylon. If you use Krylon, you can use either white or gray. I typically choose white.
Sandpaper: You will need both fine and rough grit sandpaper.
Tools Needed:
Airbrush: An expensive unit is not needed. I went with an entry level model by Badger that attaches to an aerosol can.
Dremel with cutting discs and one sanding point (resembles a cone).
Electric Drill with a very fine bit (optional for cutting out key slots in back of helmet).
X-Acto Knife (optional) for getting to those hard to reach corners of the T-Visor, and for trimming the rear key-slots if you choose to cut them out.
Paints Needed: Floquil, Polly Scale and Testors Paints. Due to the extensive supply needed, I purchased some of mine through Hobbylinc, others through Tower Hobbies. For a color listing, please look further down this column. All paint recommendations are by Rogue Studios of The Dented Helmet.
Panzer Olive Green: Dome, lower cheeks, left earpiece.
PRR Green: Upper cheeks
Green RLM 73: Back of helmet below "headband"
Box Car Red: for T-Visor/ mandibles area and "headband." This color is more screen-accurate.
Caboose Red (optional replacement to Box Car Red): If you are a fan of Boba, you have undoubtedly seen studio "glamor shots" of his armor where the T-Visor area is a brighter red than the movie versions. Caboose red is very close to this brighter color.
PRR Maroon: Various places on T-Visor/mandibles and "headband."
Earth: Range-finder ear pieces
Chrome Silver (or bright silver): Base coat, portions of right RF ear piece.)
Personal note: You can purchase the chrome either in the 1oz bottle size (for airbrushing) or in a spray can by Testors. While the airbrushing is easier in terms of a reliable coat, the Testors spray is much easier to use (overall) and is cheaper too.
Rust: Various areas.
Reefer Yellow: Vertical stripes on left side of helmet. UP Armor Yellow could be used as an alternative as it is very close in color.
Concrete: Damaged area on back, half-circle on left ear piece.
Light gray: Various areas.
Lark Dark Gray: Various areas.
Green RLM 25: Green splotches on back of helmet
Flat Black: Range finder top, designs/markings on ear pieces. Krylon spray can be used.
Steel: This is an optional replacement to the chrome/bright silver color. It’s less shiny.

2009 Day 1, Cutting:
Tools Needed: Dremel with cutting and sanding discs, rough grit sandpaper, fine grit sandpaper, LocTite Liquid Metal, X-Acto Knife. Eye protection is also HIGHLY RECOMMENDED!
Time required: Approximately 30-45 minutes
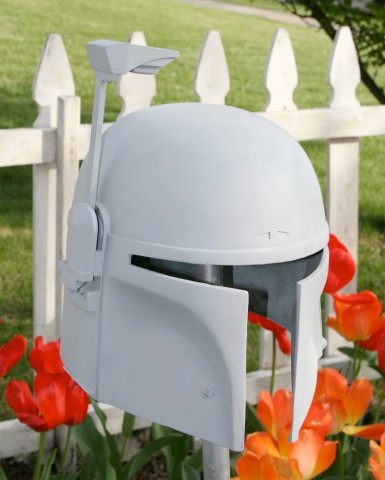
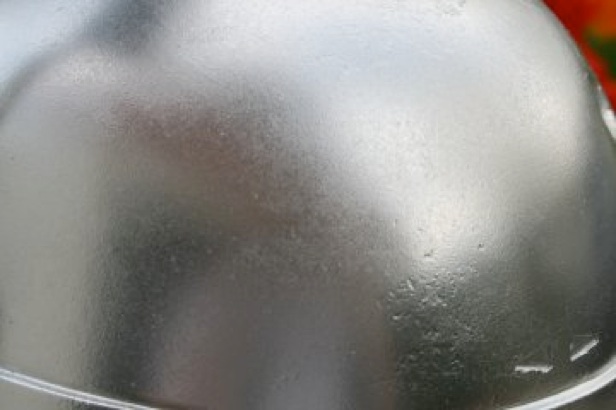
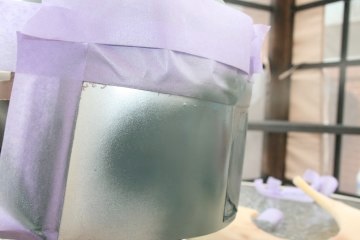
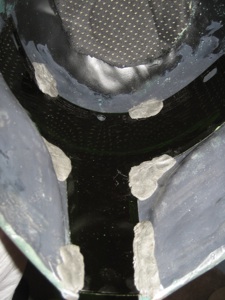
This is what the helmet looked like in it's original format. Note that the visor is only a small piece of a tinted transparency sheet. All of the black area will need to be cut out.
Due to the design of the Dremel, it was too difficult to cleanly cut the far corners of the T-Visor area. As a result, I got as far as I could and literally pulled out the remaining tab with a pair of needle-nosed pliers. I then used an X-Acto knife to cut clean corners on each side. If you still have a bit of roughness there, fold a piece of rough grit sandpaper tight enough to fit in the corners, and pull it back and forth quickly to smooth out the three areas that make up the corner.
Sand down all of the areas you just cut to make them smooth. Additionally, you will need to sand down the back side of the T-Visor (from inside) to have a reasonably consistent depth all around so that the new visor will be flush to the plastic when installed. Depending on how the helmet was manufactured, there may be inconsistencies with the plastic's thickness in certain areas. If this is the case with your helmet, use the Dremel sanding cone (it's safer to use than the sanding cylinders in terms of how much plastic will wear away). Follow up with the rough grit sandpaper to get everything uniform, and then use a fine grit sandpaper to get that perfect smoothness.
Now, looking at the front of the helmet, be sure that the front part of the T-Visor is squared off. Assuming that it is, take a popsicle stick and place it to the interior sides of the T-Visor and see how straight your cuts were. If you see any gaps between the popsicle stick and the helmet, fill the gaps with LocTite Liquid Metal paste. Let it sit for about 20-30 minutes and use a fine grit sandpaper to smooth the paste out, and re-test the area with a popsicle stick. If everything is perfectly straight, great! If not, then re-apply the LocTite Liquid Metal and repeat the process until you are satisfied. Be sure to do this all around the interior edges of the T-Visor. In most cases, the far corners weren't molded symmetrically (i.e. one side is wider than the other by a few millimeters). If this bothers you, you can fix it with the LocTite Liquid Metal. Please note though that sanding of Loctite Liquid Metal should be done within 25-30 minutes of the initial application. If you wait longer than 6 hours, it becomes extremely durable and quite difficult to sand down.
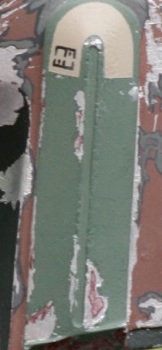
As a final step here, use Bondo glazing putty to fill in the Don Post and LucasFilm Ltd. stamps on the reverse side. Be sure to press the putty into the impressions fully. After a few hours, sand off the excess putty. If it looks filled in and completely smooth, verify this by spraying a light coat of primer over this area. The light coat of primer will show any missed spots. If needed, re-sand and re-apply a thin coat of Bondo glazing putty, let dry, and re-sand once again. The primer will be sanded off a bit too thus leaving you with a nice smooth surface. Hopefully, everything will be filled in properly at this point. If not, repeat the Bondo/sanding/priming process until you have those stamps completely filled in.
The Don Post Studios and LucasFilm Ltd. stamps are no longer visible after two fillings.
2009 Day 2, Cutting Part 2: Key Slots (*optional step*):
Tools: Drill with a very fine drill bit, X-Acto knife, Bondo, 1 or 2 popsicle sticks, fine grit sandpaper cut into small strips.
Time required: Approximately 60 minutes
This step is entirely optional. Some people like to keep the "key slots" in the back closed up . Generally, I prefer to cut them out and add a screen on the inside to improve air-flow to the interior of the helmet, but in the case of this particular helmet, I chose not to. But if YOU choose to perform this step......
Take an electric drill fitted with a very small drill bit and drill holes into the depressions of the key slots. Make them numerous and close together. The purpose of this is to weaken the plastic, and to make cutting with an X-Acto knife much easier.
When finished with the drilling, use an X-Acto knife to cut the key slot impressions exactly way they are molded.
If you make any errors with regard to making them uniform, you can use Bondo glazing putty (since it's easier to sand) to re-mold them, provided you didn't screw up too much. If you need to do this, apply Bondo with a popsicle stick, let dry, and use fine grit sandpaper to smooth out the rough edges and to get the even lines you are looking for.
Wipe the helmet off and prepare it for the next stage.
2009 Day 3, Cleaning and Priming:
Tools: Acetone, lots of paper towels, fine sandpaper, primer.
Time required: Approximately 60 minutes
Soak up some paper towels with acetone and scrub the helmet down until all of the exterior paint is wiped away leaving only the nasty green finish of the vinyl plastic. This will remove all of the slick paint Don Post used, and allow your primer and base coats to adhere better.
Let dry for about 20 or 30 minutes and then sand it down with a fine sandpaper. Wipe down the helmet with a dry paper towel to remove any sanding dust, and proceed to coat it with primer.
If you use Duracoat filler primer, only one coat is needed. If you use Krylon, I'd recommend two coats. Let the first coat dry for a few hours before applying a second (if needed). I would recommend waiting a full day (whether you used one coat or two) before moving on to the next step. If you live in a warm climate or are doing this in the summer months, leave your helmet out in the hot sunlight for a few hours so that it quickly bakes on.
I cannot emphasize enough that you don't need to prime the helmet all in one step. If you over spray, you will get paint runs which will cost you more time and effort to correct (with sanding). Sometimes a first coat doesn't necessarily provide complete coverage. It's okay if that happens. Just let it dry fully, and then apply a second coat which should completely cover the helmet. Patience will certainly save you time and effort in the long run with this sort of project.
2009 Day 4, Base Color:
Tools: Airbrush*, bright silver or chrome silver, or steel, paint thinner.
Time required: Approximately 30 minutes.
Using an air brush, I used chrome paint (3 parts paint, 1 part thinner), and covered the entire surface area of the helmet. I let this sit in the hot summer sun for about four hours, and then stored the helmet inside overnight without any more work done to it.
* Note: You may need two 1 oz. bottles of this paint for complete coverage of the outer helmet, and visible portions underneath on the inside. You may also choose to use "Bright Silver" as an alternative to "Chrome.
** Also, Testors sells a chrome spray paint (in a small can) that should do the job just as well, and would be a lot easier than using an air brush. Just make sure that your efforts are spent on making an even coat of chrome over the entire surface area of the helmet (i.e., no dripping, no splatter).
2009 Day 5, T-Visor Color:
Tools: Airbrush, Floquil Box Car Red, Painters Tape
Time required: Approximately 30 minutes.
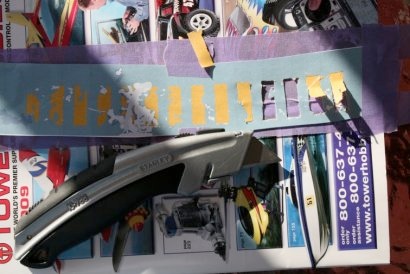
The first area I chose to focus on was the T-visor area. Carefully masking the portions outside my area of initial focus, I used regular masking tape for the areas directly surrounding the T-visor area and "headband," and painters tape for all other areas. The painters tape has less adhesive making it less likely that you'll pull the chrome off when removed. Regular masking tape needs to be affixed for the areas surrounding your paint-work because it will stay tight to the helmet thus reducing the likelihood of paint running behind it to parts you don't want colored.
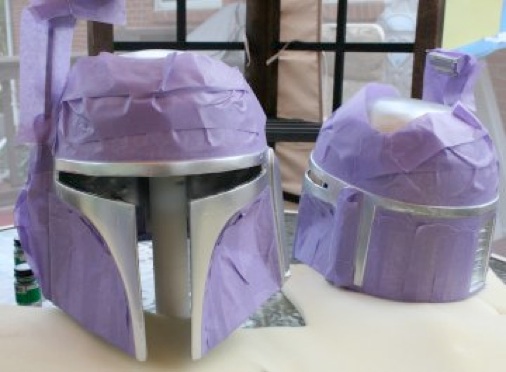

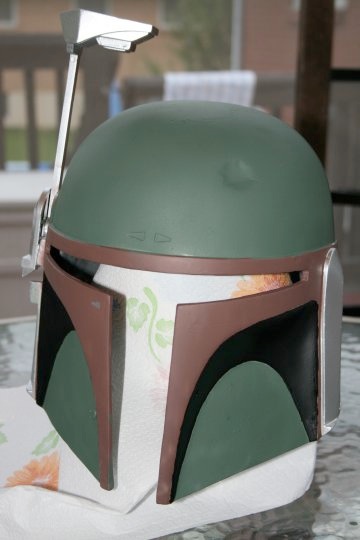
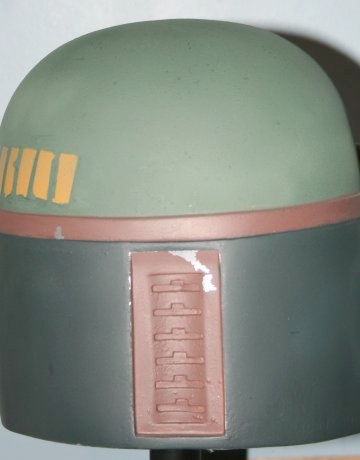
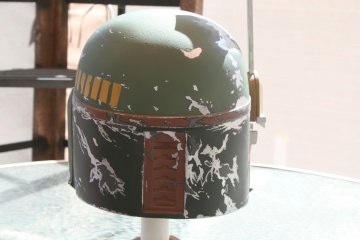
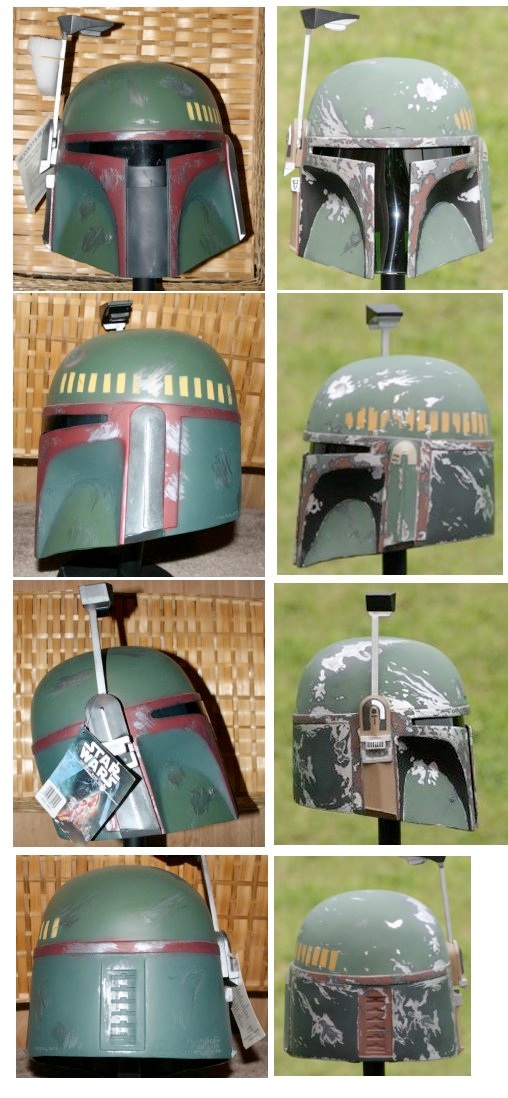
The helmet described throughout this particular guide is the one on the left.
Use Floquil "Box Car Red" for this area (3 parts paint, one part thinner). I would suggest applying two coats, one hour apart from each other
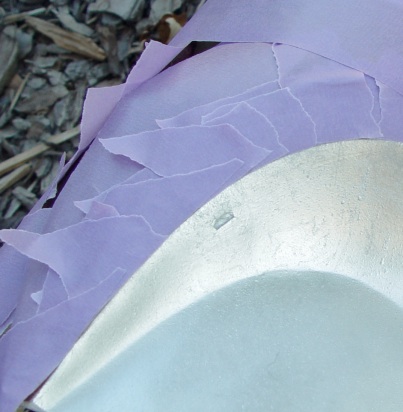
I should also note that some people have difficulty masking the T-visor due to the curvature. I recommend using 6" strips of masking tape and "bending" the tape as shown in the close-up two pictures below. It can be done with patience, and the end result is well worth the effort made.
Let dry for an hour or so before attempting to remove the masking tape.
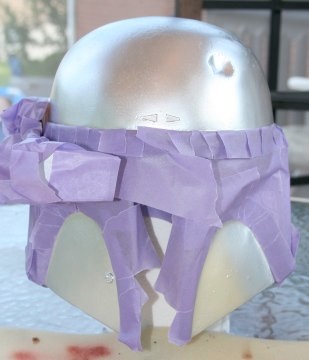
You can also try the technique I used on my Mystery Helmet where I used small strips of painters tape and actually created a curve by overlapping the pieces as shown below:
2009 Day 6, Upper Cheek Color:
Tools: Airbrush*, Floquil PRR Brunswick, Painters Tape
Time required: Approximately 30-40 minutes.
* a paint brush can be used as an alternative to airbrushing
The next stage of my project involved painting the upper cheeks (the area between the t-visor and the lower, more flat area of the cheeks). Masking this area can be very tricky due to the curvature both above (where it meets the T-visor) and below (where the lower cheeks are). Additionally, you won't want to use regular masking tape to cover the red "T" area. Doing so will result in paint being pulled off when you remove the tape. Use painters tape (such as the purple color variety by Duck Tape). It has a mild adhesive that will not remove the paint. Just be sure that it is secure to the area you want masked because with light pressure, it will lift off. Additionally, I would recommend using many small strips in order to follow the curvature of the area you want masked off. Unlike regular masking tape, you can't bend the Duck Tape because the adhesive doesn't bond as well.
For the lower cheeks, you can use regular masking tape since the chrome color won't peel off when the tape is removed.
I used Floquil PRR Green; 3 parts paint, one part thinner for this area. I believe this is also called "Brunswick Green."
I used an ultra fine-point modeling paint brush to smooth out the curved lines with the PRR green, though, with the masking technique described above, not much hands-on work will be needed - - only right around the corners to get that perfect curvature.

If you are using PRR Brunswick Green for the first time, you may be freaked out by it's extremely dark color. It looks almost black. Also, if you are ordering PRR Green online, some retailers refer to it as "Pacific Rail Road Green."
2009 Day 7, Dome and Cheeks Color:
Tools: Airbrush, Floquil Panzer Olive Green (two bottles), Painters Tape
Time required: Approximately 35-45 minutes.
Both the dome and cheeks require Floquil's Panzer Olive Green. Very carefully mask off the upper cheeks (the dark color) using the purple painter's tape, and the red visor/headband area. Because the purple tape doesn't lock out every bit of spray (due to it's low adhesion), you may have to do some touch up work with a brush or spray later on to the upper cheeks and visor/headband area later.
Note: Due to the slick nature of the chrome base color, the Panzer Olive Green may show "cracks" revealing the chrome underneath. It is imperative that you exercise patience with painting. Be sure that the helmet is uniform in color in all areas. This may take a few more coats of paint than what I've described, and may even take a day or two to verify that you have perfectly uniform coats on the helmet.
I recommend applying a minimum of three coats to the dome, and two to the cheeks. The first coat should be a light dusting to provide some tack for the next two coats. The chrome is very slick and over spraying could result in the paint running. Much unlike the Mystery Helmet, the vinyl plastic of a Don Post helmet doesn't absorb paint very well.
After the first coat, let dry for several hours in the sun (if possible), then re-apply.
When finished, carefully remove the painters tape so that you don't tear the previously painted areas.
2009 Day 8, Back Color:
Tools: Airbrush, Green RLM 73, Painters Tape, Masking Tape
Time required: Approximately 25-30 minutes.
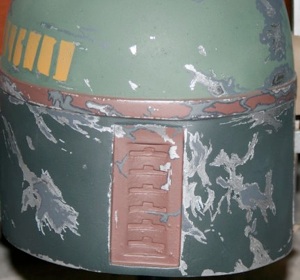
The "back area" pertains to the portion behind the ears, below the "headband," but excluding the recessed key-hole area.
Use Green RLM 73 for this area of the helmet, masking off the headband and red ear-area with purple painters tape and regular masking tape for the key-hole area.
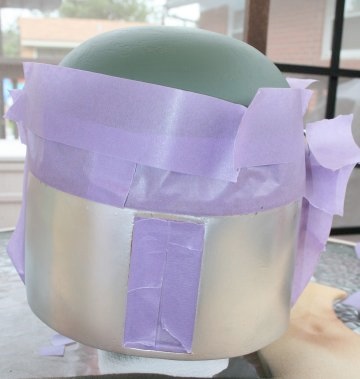
What's not shown in this picture is that I tucked a few paper towels into the top of the masking tape to protect the dome from overspray. The more you paint you apply in previous steps, the more effort you must take to protect it.
RLM 73 can be a very difficult color to find - and Tower Hobbies was the only place I found to carry it. That being said, if you do order it through Tower Hobbies, make sure you speak with a customer service rep and explain that you want the bottles checked for freshness prior to them being shipped.
During my Mystery Helmet project last year (2008) I had three separate shipments of coagulated RLM 73 paint that were completely un-useable. Upon insistence of having someone physically open bottles to verify the consistency, I was finally able to get fresh bottles of RLM 73 on the fourth shipment Unfortunately, this matter put me a full-month behind schedule. I was not charged for the previous three shipments, and the customer service department was trying to be helpful throughout the ordeal. If you can't check the bottles yourself, ask someone to do it for you. Trust me when I say that it will save you a considerable amount of time.
2009 Day 9, Key Holes (Back) Color:
Tools: Airbrush (or Paintbrush), Floquil Box Car Red, Painters Tape
Time required: Approximately 15-20 minutes.
Masking off all areas of the rear of the helmet except for the recessed key-hole area, use Floquil "Boxcar Red" paint for this section. Here, I would advise painting by hand, letting the area dry, and then lightly dusted the area using an airbrush to remove any brush strokes that might have been showing.
2009 Day 10, 11 & 12: Touch up to cheeks, headband area, and re-paint of mandibles.
Tools: Airbrush, Paintbrush, Floquil Panzer Olive Green, PRR Brunswick Green, Floquil Box Car Red, Painters Tape/Masking Tape
Time required: Approximately 60-90 minutes with full day breaks between each section to allow for complete drying..
Because I used painter's tape for most of the front work, there are some paint dust marks from where my spray seeped underneath the masking tape. For this, I carefully masked just enough to allow me to make a fine paint line that separates the lower cheeks from the upper cheeks. I chose a fine point hobby paint brush to do this delicate work.
2009 Day 13-14, Painting the Ear Pieces:
Tools: Airbrush, Floquil Earth, Panzer Olive Green, Flat Black, Chrome (or Bright Silver), 5.5" Avery Label Paper, Scissors, X-Acto Knife, Black Sharpie Marker (a new one with hard felt point), Sharp Pointed Steak Knife, Painters Tape, Paper Towels
Time required: Approximately 150-180 minutes.
Your ear pieces should still be chrome at this point. Now, you will need to apply the overcoats:
- Left ear piece: Panzer Olive Green
- Left ear piece design: Concrete
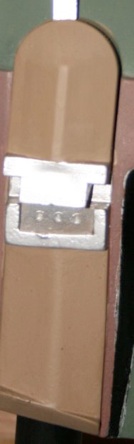
- Right ear piece: Earth
- Range finder top: Flat Black Spray Paint (Krylon)
* you may choose to keep the under side of the range finder piece chrome as I did in the picture below:
- Touch-up: Chrome or Bright Silver (if needed)
When painting the right ear piece (rangefinder side), be sure to mask off the area that will remain metallic silver/chrome in color, and mask off all other areas that are not meant to be painted.
Plan on three to four sessions of very light coats being needed. Because of the curvature of the pieces, focused spraying will result in pooling or excessive dripping. Just use light coats each time until you have full coverage on the outer surfaces.
With regard to the right ear-piece (range finder side, #1 below), I'd recommend applying the Earth color first and allowing to dry for a few days before masking off for application of the metallic color if you need to do some touch-up work. I've found Earth to be more challenging in terms of mess and adhesion than the other paint colors.
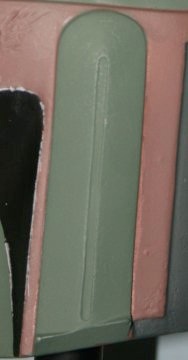
When you begin work on the left ear piece (#2 above), be sure not to overspray. It is recommended that you start off with just a dusting and let dry, then follow up with a more thorough coat. Let the second coat dry for several hours before applying a third or fourth coat as necessary. Overspray will result in paint "pooling" in the recesses of the earpiece, or on the mini-platform at the base. Patience really pays off if you take your time with the ear pieces
[Left Ear/Range Finder SideTemplate]
Please note that printing this template on label paper (such as the 5.5" Avery label paper) works best. Simply use an X-Acto knife and cut out the upside down "U" shape before applying to the left ear piece. Make sure the label template is secure so that there is no paint leakage when filling it in.
Use Floquil "Concrete" to paint the upside down "U" using very little paint on the brush to prevent leakage. I literally used 5 coats, each time having very little paint on the brush, and giving a minimum of 10-15 minutes to dry between coats.
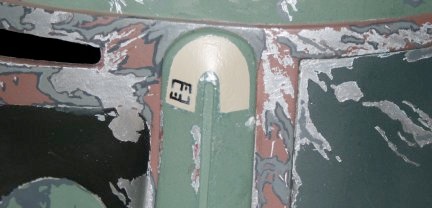
If you encounter any leakage, it should be minimal. If that's the case, use a sharp pointed steak knife and just scratch out the excess Concrete color to reveal the Panzer Olive underneath. If that doesn't turn out the way you want it to, you may want to scratch a little deeper to reveal the chrome/bright silver under-layer so that it looks like minor battle damage. This is up to you to decide upon.
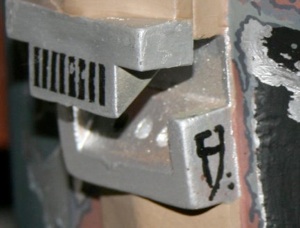
For the right ear, download this template and print it on 5.5" Avery label paper, and cut to fit. Take a black "Sharpie" and run the side of the felt tip to the interior and exterior edges of your new label to remove any "white" that appeared from cutting the label.
Again, because DP helmets are not uniform, there may be variances in size, thus requiring additional length to the bottom portions of the horseshoe graphic. I created my template longer than it should be so that it can be adjustable. Simply cut off the excess length as you see fit. There should be a small amount of space between the bottom of the horseshoe graphic and the mini-chrome platform of the range finder assembly.

Alien Graphics:
Now that you are almost finished, you may want to take notice of the small details that really make a difference - - such as the small symbols/glyphs on the ear pieces.
Tip: If you have a VERY fine point paint brush, you can apply (by hand) the symbols found on the ear pieces. If you find that your brush is too soft despite being a fine point, dip your brush into the Flat Black paint and let it dry. This will give it a hard, pencil like feel. Re-dip into the black paint, and draw in your designs!
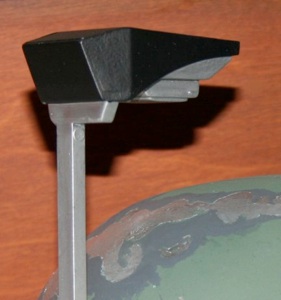
Range Finder:
Last but not least, it's time to paint the upper portion of the range finder. For this particular helmet, I chose to mask off the under-portion of the range finder so that it resembled some of my higher end Fett collectibles, as well as provide a more "high-tech" look. You may choose to paint yours completely black. That's up to you. I used Krylon's flat black with the new adjustable nozzle. I used a VERY light coat the first time around (because again, that chrome under-coat is slick!) and let dry for 15 minutes. I then applied a second coat that provided nearly 100% coverage and let dry for a half hour. I finished up with a final coat and let dry for an hour. I left this to set overnight, and revisited it the next day using some chrome paint and a paintbrush to do some minor touch up work around the masking lines.
Miscellaneous Details:
On the right ear-piece, I made creative use of masking tape to create the mini-vertical marks, the "blotch", and the "T" on the range finder parts. Before the paint was fully dry, I placed a piece of purple painters tape OVER my new paint work, and pulled it off almost immediately. This pulled some off some of the wet paint, thus leaving the remaining images "weathered" and "worn" looking. The effect actually turned out very well. For the symbol on the front part of the right ear piece, I drew it by hand using a rigid fine-point paint brush.
2009 Day 15, Adding Vertical Stripes
Tools: Airbrush, Reefer Yellow, Panzer Olive Green (for touch up work), X-Acto Knife, Painters Tape, Paper Towels
Time required: Approximately 120 minutes.
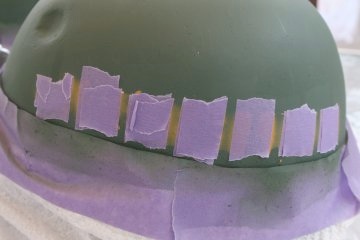
I downloaded the kill stripe template from The Dented Helmet and printed it out on paper that wasn't too flimsy. I then took 2" purple Duck Tape brand tape and applied it to a catalog that had a glossy cover (so that the adhesive would still be reasonably good when carefully pulled off later).
I laid the template over the masking tape and cut out the template with reasonably hard pressure to make sure my cuts were clean. I'd recommend using an X-Acto knife which makes this task much easier than a typical razor. Unfortunately for me, I had misplaced my X-Acto knife and had to use the knife pictured below.
If you choose to use this method to cut out your kill stripe stencil, make sure to use 2" painters tape and affix it to a surface that is likely not to remove the tape's adhesive; for instance, a glossy catalog cover or a glass table. While I used a box cutter blade, I'd highly recommend an X-Acto knife for this project. I wish I could have found mine! It would have made doing this a whole lot easier.
Once the stripes are cut out, carefully trim the tape so that it matches the curvature of the template you downloaded. This will allow you to place the tape-template against the helmet's "headband" so that the stripes are even as they wrap around the dome.
Cut the new tape-template into quarters so that they can wrap around the side of the helmet without warping or wrinkling. Be sure to line them up carefully so that they (i.e. the four sections) are equidistant to each other and to the headband.
Press the tape-template firmly to the helmet making sure there is minimal lift around the small cutouts you made.
Mask the rest of your helmet so that paint will not get on it during the upcoming painting process. When masking here, I used strips of 2" of purple Duck Tape brand tape above and below the target area, and then taped paper towels elsewhere to prevent waste of additional tape (and to save money!).
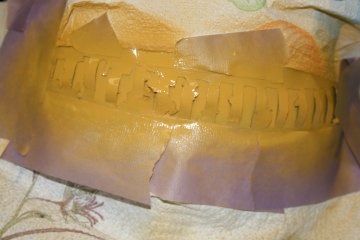
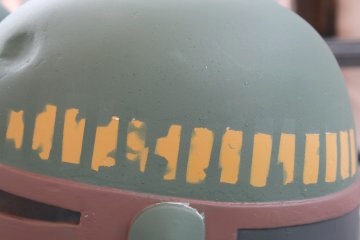
I highly recommend using an airbrush from about 14" away and lightly dust the area at first. Do not focus on one area too long otherwise the paint will drip beneath your tape-template and create a mess. Just lightly spray the kill stripes with Reefer Yellow and take a 15 minute break. You should still see a lot of green still showing. After your mini-break, spray another light coat over your previous work, and let set for 15 more minutes. You should now have mostly yellow showing. A final light coat should do the job. Let this dry for an hour before peeling off the mask/template. You do not want wet paint to mark areas that you did not intend it to be on.
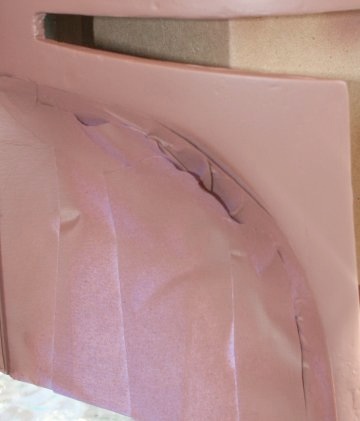
If for some reason you have paint that leaked behind the tape-template (as shown in the example below) don't fret! It can be fixed, though you will have set yourself about an hour or two behind schedule. See my trouble-shooting tip below for help if this happens to you. If everything turned out okay, you should give yourself a pat on the back because this is pretty challenging to do!
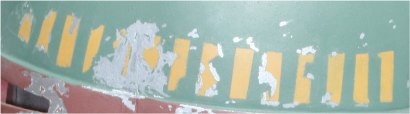
Uh oh! Looks like this could use some touch-up work. This can be corrected with a little effort and it will turn out just fine!
Trouble Shooting: If you opt to use a paint brush as opposed to an air brush, you will likely encounter paint that drips behind the mask you applied. The end result will be quite a bit of yellow paint between the kill stripes. Additionally, air brush paint application isn't fail-proof either. You could end up with yellow paint residue outside your target areas. If this happens to you, I have two solutions which worked well for me in the past.
First things first: Don't panic!
Second, cut out small strips of masking tape that are just big enough to cover every stripe. Don't make them too long otherwise your "repair" will be more obvious (trust me). Now, take a piece of tape and cover up one stripe so that you are perfectly aligning it to one side. Take another piece and put it on the nearest stripe aligning it perfectly the side facing the other masked stripe. This will expose the green area in between where you have unwanted yellow paint. Repeat this process across the rest of the kill stripes (though be aware that because of your tape placement, some stripes will have to be corrected later on).
Take very fine grit sand paper and gently wipe down the yellow paint residue between your masked areas so that your surface is once again smooth. Take a dry paper towel and clean the area. Mask off all of the exposed red areas on the helmet (T-Visor area, headband, ear area, etc.).
Now, using your air brush with loaded Panzer Olive Green, lightly spray the area with a smooth back and forth motion. Do NOT focus on a single area. You do not want so much paint accumulating that it actually looks wet or uneven. You just want to lightly coat the yellow this first time around. Once you have some green covering the yellow, stop and wait about 10-15 minutes for it to dry. Apply a second coat of green to the affected areas. At this point, there should be very little yellow showing. Stop, and wait another 10-15 minutes. Your final coat should effectively cover any of the residual yellow between your kill stripes. Let dry for a full 30 minutes before removing the tape.
Now, repeat this process for the other areas of yellow between the kill stripes that you couldn't get the first time around. Follow the same process outlined above.
If you have yellow bleeding above and below the kill stripes, simply align your painters tape to the top most portion of the stripes that you want to keep, thus exposing the areas you want to "clean." Follow the same three step process of painting, drying, and re-coating.
I should also point out that you may need to custom cut some masking tape pieces to fit around some of the more uniquely "damaged" kill stripes.
As a final note, earlier on in this section I mentioned to use masking strips about the size of the stripes. If you use extra long strips of tape, you will show paint lines on the dome making it obvious that you did repair work. If this happened inadvertently, simply mask off your stripes horizontally with a big strip of painters tape so that the green area above each stripe is exposed, and lightly air brush Panzer Olive Green from about 14"-18" away starting right on the masking tape, and brushing upwards to the top of the dome. This will gently blend in the paint making your paint marks invisible. Only one or two light coats will be needed here.
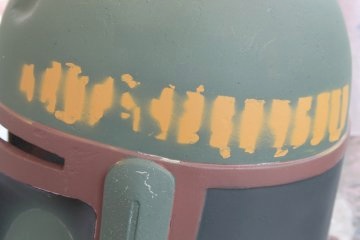
As you can see in the image above, some of the stripes have "ghosts" above them (the 4th, 5th, 6th and 7th stripe from the right) from where the masking was. To erase these, simply mask the top portions of the stripes with a little bit of tape, and dust the area with Panzer Olive Green from a distance of about 14" inches. You don't want to apply a new layer of paint, just enough coverage to blend!
When you are finished, your stripes should look really good.
Here you can see how no messes can be found between my stripes, this was due to careful masking and light dusting of new paint. Any light paint bleed that still remains around the kill stripes can be taken care of with the "scratch method" of battle damage described later.
2009 Day 16-17, Battle Damage Phase 1: (Scratching):
Tools: Butter Knife with slight serrated edge. Chrome (or Bright Silver) paint and paint brush for touch-up work.
Time required: Approximately 120-150 minutes.
The purpose of scratching is to give the illusion of battle damage by revealing the chrome silver undercoat. There are two tools you will need for this phase: 1) a fingernail (or thumbnail) and 2) a butter knife without much of a serrated edge.
As you well know, there are numerous scratches all over Boba's helmet, but in my opinion, there are about 8 notable ones that you should focus on trying to get reasonably accurate. They are:
1) Dent in right forehead (if you are looking at the helmet)
2) "Fire scratch" on left forehead (if you are looking at the helmet)
3) Right mid-cheek area (if you are looking at the helmet)
4) Right mandible area (if you are looking at the helmet)
5) Left mandible area (if you are looking at the helmet)
6) Long scratch at top of helmet
7) Left back side of helmet.
8) Scratch around 5th kill stripe from left.
In my efforts, I tried to match as many as possible without becoming obsessive compulsive. For the most part, I identified the major scratches and locations and started with those. I then tried to locate mid-size scratches and worked on those next. Then, I looked to the smaller scratches to even out the appearance. From there, I took a little creative license and "invented" some of my own.
To begin, start with the main dent. Try scratching off the green paint with your thumbnail and work around the dent. If you find that you are having problems removing the paint, use a very dull butter knife and try to get the scratching started, and go back to using a fingernail if you want. If you find that even that doesn't work, then try a steak knife (a last resort!). Try not to dig too deep so that you get into the vinyl plastic. You only want to remove the top coat of green.
When you are through, step back and observe what your helmet looks like. If it is to your liking, great! If you feel that your exposed chrome undercoats are a bit too dull, simply use a fine paint brush and apply a fresh layer of chrome silver over the chrome base. Be careful though, you may leave unwanted brush strokes.
If you opt to have brush strokes visible, be certain that they are consistent in direction. For instance, if you decide to brush what I call the "fire scratch" (left forehead of Boba's helmet if you are looking directly at it), make sure that your brush work begins on the red mandible and that you brush in the direction of lower right to the upper left leading to the fire scratch. This will create an illusion of impacted metal traveling in a constant direction to the upper left of your Fett helmet. If you disregard this, the damage will not look consistent with textured "metal" in all different directions.
As a final note, be sure not to apply chrome paint over any areas that should not be "damaged" if you are working with the scratch method (as opposed to the topical method).
2008 Day 18-19, Battle Damage Phase 2 (Painting & Weathering ):
Tools: Airbrush, Reefer Gray, Lark Dark Gray, Weathered Black (optional), PRR Maroon, Floquil Rust (optional), X-Acto Knife, Painters Tape, Paper Towels
Time required: Approximately 150-180 minutes.
Using the MR helmet as a reference, I used Floquil "Reefer Gray" and "Lark Dark Gray" and to paint dark and light weathering marks respectively. I started with the mandibles first as they were the easiest to do. I began with the Reefer Gray, applying it to areas of importance, and then letting it dry before applying the Lark Dark Gray. You don't want the dark gray to bleed into the lighter color.
***Note: As mentioned earlier in this guide, the vinyl plastic used in making DP Fett helmets has different characteristics than the more absorbent resin of a Mystery Helmet - - and this difference in material properties may result in unwanted color variations. If you find that your Lark Dark Gray is not dark enough, I would recommend trying "Weathered Black" for some of your outlining. ***
If you are right handed, I'd recommend starting on the left side and when finished applying both colors, taking an hour break to let the paint dry completely before starting on the right side. This is a delicate process, so you want each area to be completely dry before moving on. After doing the mandibles, you should have a pretty good idea how this light gray/dark gray process works.
I next moved on to the cheeks. The Light Gray is no good over the Panzer Olive Green so stick exclusively with the Lark Dark Gray. Since these are pretty key weathered marks, try to nail down their exact location, and come reasonably close to their pattern.
Once those dried, I moved on to the top of the helmet and began working around the three big scratches (dent, "fire scratch," and long top scratch). When those dried, I finished my work with the smaller scratches on the dome of the helmet.
I next worked on the headband area around the helmet - following a bit of the MR helmet as well as using personal discretion.
I next worked on the sides of the helmet, around and on the Panzer Olive Green ear-piece.
Finally, I tackled the back of the helmet which was a nightmare. If you've seen the movie production helmet, or the MR helmet, it's an un-patterned mess of four colors: Concrete, Light Gray, Lark Dark Gray, and Green RLM 25. The #25 green is really odd, and there are only a flew blotches of it on the rear right side of the helmet.
Unlike my work on the Mystery Helmet, I chose to keep it a bit more simple for this particular Don Post version. I used only Light Gray, Lark Dark Gray, Weathered Black, and finally some Chrome for touch-up work.
You can choose to be as detail-oriented as you want to be, or as simple as you want to be. It's entirely your choice. The back of the helmet is supposed to look like a mess, and well........just remember that. A few examples are as follows:
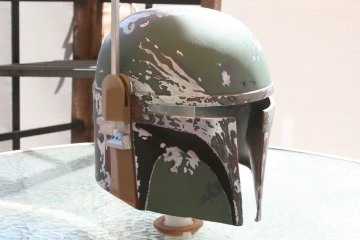
Here is the Mystery Helmet I did in 2008 that features a much more elaborate damage pattern.
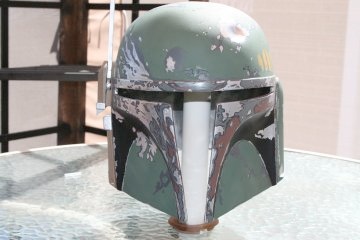
Here is the Don Post helmet (2009 project) with a more simplified rear damage design. Some of the target areas have a similar outline to the Master Replicas Fett helmet, but just not as elaborate. The back-end is also less congested with various overlapping colors. Please note that the lighting situation in the two images above were considerably different at the time the photos were taken. The exact same colors were used on both helmets even though they appear to be quite different above. The kill stripes also appear thicker on the DP helmet due to it being a smaller size to the Mystery Helmet which is a 1:1 scale. The DP helmet is not.
If you want to apply the Green #23, go for it. If you don't -- that's fine too. For the DP helmet in this case, I chose not to use it.
On the left ear piece, I highlighted some of the chrome-bearing scratches with PRR Maroon and Rust to give it a more aged/worn appearance. Don't go to heavy here; a little goes a long way.
Finally, I weathered the red key-hole box area using both the Light Gray and Lark Dark Gray colors with a bit of the Weathered Black to make the scratches "pop" more.
2009 Day 20-21, Interior Padding/Lining
Tools: 1/2" Foam Padding (3 'x 3'), Adhesive-backed Velcro, Jersey Material (or similar breathable material), 3M Adhesive Spray, Scissors, Helmet Stand or Dumbbell (cast iron, one piece).
Time required: Approximately 45-60 minutes.
Note: Prior to beginning this stage of the DP Fett helmet reconstruction, you may want to paint the interior portion of the helmet black in the event someone gets a partial peak underneath if/when you wear it. Also, painting the interior black will make it more difficult to see through the visor if the helmet is on display. Just be sure to mask ALL of the T-Visor area from the INSIDE before painting. The last thing you'd want is for the spray to hit the inside portions of the mandibles after you worked so hard on them.
Because the DP Fett helmet is not a 1:1 scale, I wouldn't recommend using any sort of padding more than 1/2" thick. The helmet by default is a snug fit for reasonably sized adults, and using a lot of padding would further crowd the interior.
For this helmet in particular, I took 1/2" foam and cut out a circular pattern that would be secured at the very top of the inside of the helmet. Before placing it however, I "dressed" it up a bit by using breathable jersey material (as in football jersey) to cover the visible side.

I used 3M adhesive spray to affix the material to the visible side of the foam (the part that would be touching your head), and then sprayed the other side so that it would stick to the inside of the helmet.
I held the foam in place for about 60 seconds with moderate pressure, and then placed on a dumbbell to dry overnight.
The following day, I cut a roughly 27" by 1.5" strip of 1/2" foam, and covered that with the jersey material. This was to be a headband of sorts to keep the helmet secure if wearing. This was affixed to the inside of the helmet using adhesive Velcro strips. That way, the wearer could remove it with ease if desired.
Tip: I'd recommend wearing disposable latex gloves (or something similar) as the adhesive can get very messy, and sticks to EVERYTHING. Some of the spray may bleed through your cover material once you apply it to the foam padding, and you don't want the adhesive to touch your skin. Also, be VERY careful how you handle your helmet when doing this. The last thing you want to do is get that sticky residue on the outer part of your helmet!
You should now have a nicely padded helmet, though fairly smelly due to all the glue. If you find that the padding takes up too much space, it should be quite easy to remove.
Tip: I'd recommend leaving the helmet upside down for a day or two in the sun so that the interior gasses out. As bad as this interior work smells after being completed, the MR Boba Fett helmet was as bad if not worse upon delivery due to the glues they used. My MR 501st Legion Clone Trooper helmet took over a year and a half to gas out!
2008 Day 22, Installing T-Visor
Tools: Dark Visor such as a welder's mask, (very dark green or dark smoke), Adhesive (I'd recommend double-epoxy or Liquid Nails), Chalk or Crayon for marking, and Dremel (or razor or scissors) for cutting.
Time required: Approximately 120 minutes (for all mounts to dry).
Cutting out your T-Visor from a welder's shield can be tricky, but I'd recommend starting by placing the visor on the OUTSIDE of your helmet, and marking the outline of the T-pattern with crayon or chalk, and giving your self an extra quarter inch all around when you first cut. See if it fits. If not, trim as needed, but trim only in small increments each time if needed.
Additionally, I would recommend using a Dremel to cut out your visor for the simple reason that scissors are challenging to cut with and not scratch the underside of the visor (i.e. the outer part). In other words, cutting a straight line is easy enough, but when you are trying to “turn” the scissors in your cut to mimic the shape of the helmet’s opening, you may very likely scratch the underside unintentionally. With a Dremel, your cuts can be clean and quick
With your new shape, try inserting it in your helmet. Chances are, it will be too big. Re-mark the visor again and trim as needed.
You will likely be close, but still off the mark by just a bit. Re-mark, and re-trim if necessary.
When you can get a good fit, determine which method of affixing the visor would be best for your situation. If you want something permanent, I'd suggest you consider double-epoxy or Liquid Nails - particularly double-epoxy. I used something called “Faststeel” by Polymeric Systems, Inc. It can be found at most major hardware stores for about $4.50. They also make something called PlastiQuick,” but I was unable to find that anywhere in my area. If you have a hot glue gun, this is also a good solution as well.
Unlike the Mystery Helmet which has a rigid body to it, the DP helmets are reasonably flexible, and that can create all sorts of problems if you are trying to hold a lens in place and glue it at the same time without making a mess. With double-epoxy, small globs of it can be applied with relative ease, and with much less chance of making a mess as compared to using a caulking gun with Liquid Nails. Simply cut of a small amount of the epoxy, knead it as instructed, place and hold (with pressure) for about 10 minutes. Below you can see the six areas I used epoxy to secure my visor in place. After all six points have been secured, I would recommend placing the helmet on a stand (or sideways dumbbell) so that all pressure is off the helmet while the epoxy continues to cure. Let it do so overnight.
You can see the six gobs of FastSteel in the photo above. Two more pieces can be used at each corner of the T-visor’s eye line too provided you have enough overlap on the inside of the helmet. When completely dry, the FastSteel will become darker than shown above. But for cosmetic purposes, I’ll paint over the dried epoxy anyway to make a more uniform appearance. I’d recommend using “Flat Black” or “Weathered Black” for the interior.
Day 23: Final Touches
Optional Tools: Flat Clear Coat, Window Washer Fluid, Black Paint, Spray Bottle.
Time Required: Approximately 60 minutes?
For a final touch, Rogue Studios makes mention of using window washer fluid (for automobiles) mixed with a little bit of black paint to remove any indication that the helmet is still too shiny and new looking. He suggests mixing the washer fluid and black paint in a regular sprayer bottle, lightly spraying the helmet and immediately wiping off with a clean rag. While I understand the logic in this, I opted not to perform this step. If you want to do this, be careful not to use too much black paint, and not to spray your helmet too heavily because the moisture/wetness may remove or smudge your paint job! Nothing like kissing away countless hours of work in a matter of seconds due to a mishap. For more information on this process (in his words), check out the link to Rogue Studio's TDH post near the top of this page in the left margin. If you do this, I'd wait a full day before sealing it just to make sure everything is COMPLETELY dry.
Sealing the helmet may be done before or after installing the visor, but in the order I went, this would have been my final step, thus requiring masking (or removal) of my visor. It may be easier to do earlier on, but I figured I'd do last minute touch-ups when I had finally had everything installed and looking good.
I'd recommend using a clear coat semi-gloss or flat. Because I am unfamiliar with the hobby versions of clear coats by manufacturers such as Floquil or Testors, I would go with something like Krylon (in the new adjustable nozzle spray cans). At the time of me writing this, I have not sealed my helmet, but would assume only a light, uniform coat would be sufficient to help protect your helmet against any unwanted paint removal from accidental scrapes or bumps.
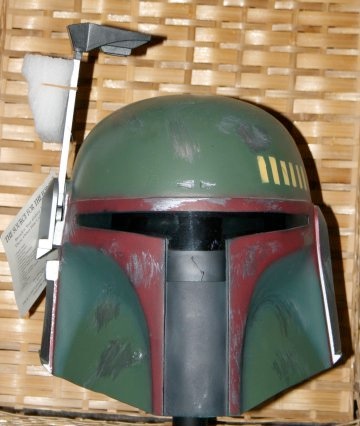
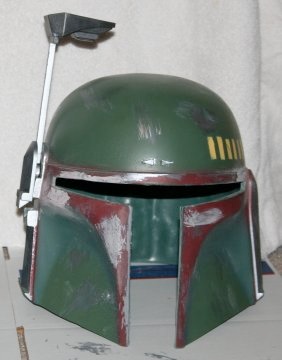
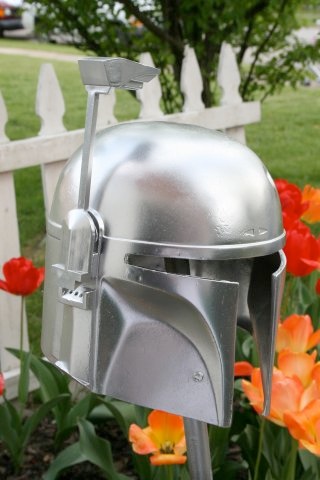
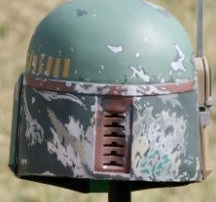
The Finished Product:
Once again, another Fett-project that I am very proud of! Please note that the sun coupled with a camera flash muted the fine detail work in the photos to the right. Many of the dark accented areas unfortunately do not show well.
Return to Main Menu
© The XBFL 2009-2017 All Rights Reserved
